
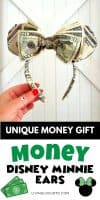
DIY Money Disney Minnie Ears are creative money gift ideas for a birthday, graduation or even Christmas! This unique way to give cash as a gift is sure to please any Disney fan!
Forget the traditional Minnie ears and create your own Disney mouse ears from cash. This craft is similar to a money origami gift, but much easier to make!

DIY Money Disney Minnie Ears
It’s graduation season and many birthdays are coming up. That means time to come up with gift ideas.
After going to Disney World and buying more Minnie Ears to add to my collection, I was inspired to create my own Money Minnie Ears for gifts.
Homemade gifts are always special, but even better if those gifts are literally made out of money!

Unique Disney Themed Money Gift Idea
How fun are these money mouse ears? They make great graduation gifts, birthday gifts, and Christmas gifts.
All you need are a few things to make these Money Disney Minnie Ears. Let me show you how!

Here’s what you’ll need
Mickey Mouse Ears Headband – I found some padded Mickey Ears on Amazon and they were perfect!
Cash – Various dollar bills are needed for this gift.
Push Pins – Sewing pins with a ball on the end make it easy to push into the dollar bills.
Twist Ties – This will be how you attach to a few of the items together.


How to Make Minnie Ears from Money
Decide how much money you want to give. Break it down into one dollar bills, five, ten or twenty dollar bills. I used 1 twenty dollar bill, 2 five dollar bills and 10 one dollar bills for my ears.
Want to save this for later?
Begin by wrapping a one dollar bill around an ear and carefully pin it to the back of the ear. Be mindful not to let the pin go all the way through the ear.
Take a larger bill, such as a five or ten dollar bill and cover the rest of the ear. Make sure the front of the ear is smooth and contains no pins.
Repeat the process on the other ear.
Wrap bills around the headband. Secure with push pins on the outside of the band. Make sure none are sticking out of the headband.
How to Make a Bow with Money
Make a Minnie bow by using all of the bills you have left besides one. You’ll need that extra bill for the bow later.
Stack the bills and wrap a twist tie around the middle. Fluff out the bills that make the bow.

Fold the last bill into a strip and wrap it around the middle of the bow. Secure with a push pin.
Slide a twist tie under the strip in the middle back of the bow and attach to the top of the mouse ears headband. Trim the twist tie with scissors.
Arrange the bow to your liking and secure the bottom of the bow on each side of the headband with more push pins.
Try your money Minnie ears on as a test, then wrap your gift!

Watch the video below to see more. This unique DIY money gift project will surprise any fan of Disney mouse ears. I hope you enjoy making it!

You’ll also like these ideas:
- 10 Graduation Party Ideas and Free Printables
- Creative Ways to Give Money
- Funfetti Graduation Cupcakes

Money Disney Minnie Ears – Fun Money Gift Idea
Video
Equipment
Supplies
- 1 Mickey Mouse Ears Headband
- Cash various amounts of dollar bills
- 1 box Push Pins
- 2 Twist Ties
Instructions
- Decide how much money you want to give. Break it down into one dollar bills, five, ten or twenty dollar bills.
- Begin by wrapping a 1 dollar bill around an ear and carefully pin it to the back of the ear. Be mindful not to let the pin go all the way through the ear.
- Take a larger bill, such as a 5 or 10 dollar bill and cover the rest of the ear. Make sure the front of the ear is smooth and contains no pins.
- Repeat the process on the other ear.
- Wrap bills around the headband. Secure with push pins on the outside of the band. Make sure none are sticking out of the headband.
- Make the Minnie bow by using all of the bills you have left besides one. You’ll need that extra bill for the bow later. Stack the bills and wrap a twist tie around the middle. Fluff out the bills that make the bow.
- Fold the last bill into a strip and wrap it around the middle of the bow. Secure with a push pin.
- Slide a twist tie under the strip in the middle back of the bow and attach to the top of the mouse ears headband. Trim the twist tie with scissors.
- Arrange the bow to your liking and secure the bottom of the bow on each side of the headband with more push pins.


Gal Sport’s website has proven to be an invaluable resource for staying updated on the latest bonuses, and their article on the Gal Sport Betting UG 2023 promotional code is a game-changer. The detailed information provided in the article, including the bonus code’s features and how to make the most of it, is incredibly helpful. Navigating the website is a breeze, making it easy to find the information you need. If you’re looking to enhance your betting experience with bonuses, Gal Sport is the go-to platform.
nice post really
This was so fun to make. Your instructions were great and it was a fabulous surprise for a friend who was going to Disney!!!
You never stop to amaze me with your creative ideas…this is perfect for any occassion.
Thank you!! They turned out much cuter than I thought they would.
This is such a clever idea Amy. I just adore it.